

The Oakshott Colourshott Bundle Blog Hop - my turn!
 I hope you are enjoying the blog hop with the delicious Oakshott fabrics. There have been some wonderful ideas of how the bundles could be put to good use! These fabric bundles are going to be released at the Festival of Quilts in August.
Today it is my turn to show you what I have done. As some of you know, my husband and I are enjoying living on the canal in the UK on a canal boat which has been very interesting and a huge amount of fun! ! So I have made a small wall-hanging inspired by the lock gates, which come in a variety of similar styles and are all amazingly heavy! and after operating approximately 50 over 3 days recently, they are very topical just now!
I hope you are enjoying the blog hop with the delicious Oakshott fabrics. There have been some wonderful ideas of how the bundles could be put to good use! These fabric bundles are going to be released at the Festival of Quilts in August.
Today it is my turn to show you what I have done. As some of you know, my husband and I are enjoying living on the canal in the UK on a canal boat which has been very interesting and a huge amount of fun! ! So I have made a small wall-hanging inspired by the lock gates, which come in a variety of similar styles and are all amazingly heavy! and after operating approximately 50 over 3 days recently, they are very topical just now!
This is the original lock gate that inspired "That Lock Gate" wall-hanging.
 Here is a tutorial of the wall-hanging "That Lock Gate"which I hope you will enjoy.
There is also a video tutorial for this wall-hanging, in 2 Parts, see below.
Here is a tutorial of the wall-hanging "That Lock Gate"which I hope you will enjoy.
There is also a video tutorial for this wall-hanging, in 2 Parts, see below.
That Lock Gate measures approx. 15" x 18".
 The Oakshott fabric bundle I received is called New Forest. The bundle consists of eight fat 1/8's and because the fabrics are extra wide, there is plenty of fabric.

Requirements for That Lock Gate:

 Set this aside while we do some foliage.
 Grass first:
Cut some lengths of the wire, varying the length from about 2 1/2" to 3 1/2". It is easily cut with scissors (not your best scissors!). I cut 15, but there is no specific number.
Cut 3 pieces approx. 4” square of fusible web, and also 2 squares each (same size) of the 3 green/yellow fabrics.
Fuse the web to the wrong sides of 3 squares, peel off the paper and lay some wire across in parallel lines, with one end level with an edge of the fabric. Lay the remaining squares on top (right side up) and press, with fusible web and wire in between.
Using the wire as a rough guide, draw close to the wire, up both sides.
Grass first:
Cut some lengths of the wire, varying the length from about 2 1/2" to 3 1/2". It is easily cut with scissors (not your best scissors!). I cut 15, but there is no specific number.
Cut 3 pieces approx. 4” square of fusible web, and also 2 squares each (same size) of the 3 green/yellow fabrics.
Fuse the web to the wrong sides of 3 squares, peel off the paper and lay some wire across in parallel lines, with one end level with an edge of the fabric. Lay the remaining squares on top (right side up) and press, with fusible web and wire in between.
Using the wire as a rough guide, draw close to the wire, up both sides.

 Stitch along, using free motion sewing, or close to the drawn line a couple of times, just rounding the top, keeping the blades of grass as thin as reasonable. Some will be longer than others, keep them fairly narrow.
The wire will help give the grass some stiffening and shaping.
Cut out numerous blades of grass, set these aside for now.
Part 1 of the video takes you to this point. (video below)
Part 2 of the video starts at this point. (video below)
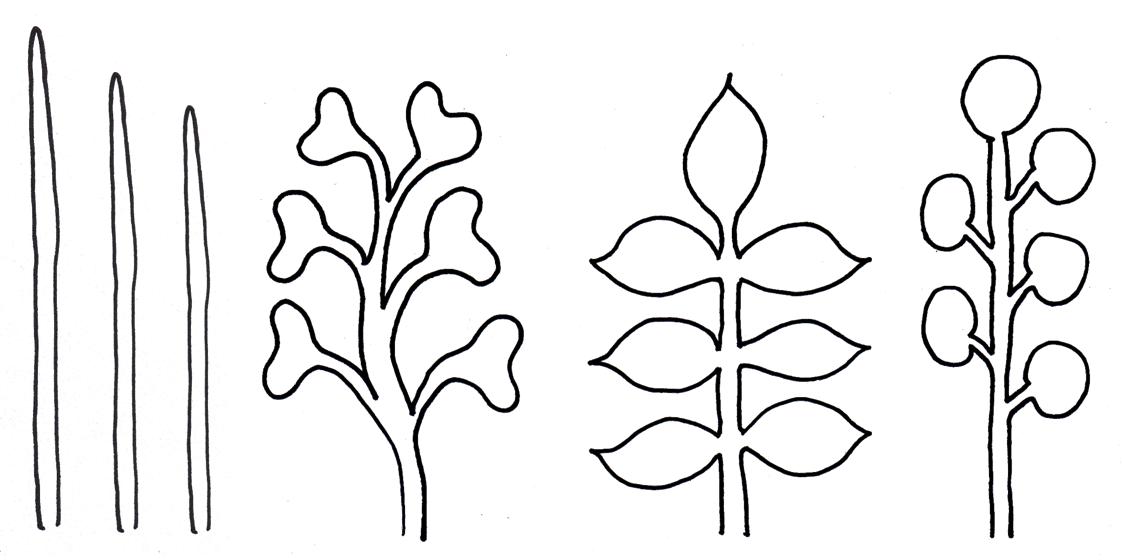
Now for some leafy shapes:
Cut some lengths of the wire, varying the length from about 3" to 3 1/2".
I cut 9, but there is no specific number. This is similar to the grass.
Cut three pieces 4” x 8” of fusible web, and also 2 each the same size of the 3 green/yellow fabrics.
Fuse the web to the wrong sides of 3 of these rectangles, peel off the paper and lay some wires across, with one end level with an edge of the fabric. Space these out to allow for leafy shapes on each wire, I did 3 per rectangle. Lay the remaining rectangles on top (right side up) and press, with fusible web and wire in between.
Looking at the suggested shapes as a guide, draw a variety on to the fused fabrics.
Now do some outline straight stitching around the inside edge of the shapes, then do some more stitching for leaf veins etc. Cut out numerous leafy shapes, set these aside for now.
Stitch along, using free motion sewing, or close to the drawn line a couple of times, just rounding the top, keeping the blades of grass as thin as reasonable. Some will be longer than others, keep them fairly narrow.
The wire will help give the grass some stiffening and shaping.
Cut out numerous blades of grass, set these aside for now.
Part 1 of the video takes you to this point. (video below)
Part 2 of the video starts at this point. (video below)
Now for some leafy shapes:
Cut some lengths of the wire, varying the length from about 3" to 3 1/2".
I cut 9, but there is no specific number. This is similar to the grass.
Cut three pieces 4” x 8” of fusible web, and also 2 each the same size of the 3 green/yellow fabrics.
Fuse the web to the wrong sides of 3 of these rectangles, peel off the paper and lay some wires across, with one end level with an edge of the fabric. Space these out to allow for leafy shapes on each wire, I did 3 per rectangle. Lay the remaining rectangles on top (right side up) and press, with fusible web and wire in between.
Looking at the suggested shapes as a guide, draw a variety on to the fused fabrics.
Now do some outline straight stitching around the inside edge of the shapes, then do some more stitching for leaf veins etc. Cut out numerous leafy shapes, set these aside for now.


Woohoo! Looking good!
Using one of the darkest rust strips, lay this, right sides together, along the top edge, raw edges even and stitch in place (1/4” seam). Flip over and press, then do a couple of straight lines of quilting across. Using one of the darkest rust strips, lay this, right sides together, along with raw edge even with line B at the top edge of the strip, stitch in place (1/4” seam).
Flip over and press, then do a couple of straight lines of quilting across.
Repeat this process for the upper section along line D.
Using the 2 darkest green strips (2” x 12 1/2”), press under 1/4” along both long edges of each strip. Position these across the quilt, covering the raw edges of the previously stitched strips and foliage. Stitch close to each folded edge. Machine quilt with a wood grain look going across the quilt.
Using one of the darkest rust strips, lay this, right sides together, along with raw edge even with line B at the top edge of the strip, stitch in place (1/4” seam).
Flip over and press, then do a couple of straight lines of quilting across.
Repeat this process for the upper section along line D.
Using the 2 darkest green strips (2” x 12 1/2”), press under 1/4” along both long edges of each strip. Position these across the quilt, covering the raw edges of the previously stitched strips and foliage. Stitch close to each folded edge. Machine quilt with a wood grain look going across the quilt.
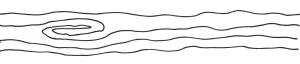

 Using 2 of the darkest green strips (2” x 15 1/2”), these are the sides, so place them, right sides together, with the raw edges level at the sides and stitch in place (1/4” seam). Press over and stitch close to the seam line. Machine quilt with a wood grain look going up and down the quilt.
 Using the remaining 2 of the darkest green strips (2” x 15 1/2”), these are the top and bottom, so place them, right sides together, with the raw edges level along the top and bottom and stitch in place (1/4” seam). Press over and stitch close to the seam line.
Machine quilt with a wood grain look going across the quilt.
Trim the quilt ready for binding.
Well. the quilt is almost done! Just the binding to go now, and add a sleeve in if you want to. Using the 3 darkest rust strips (2 1/4” x 26” strips), join them together to make the binding, fold in half along the length.
Trim the quilt and bind. If binding entirely by machine, stitch the binding on to the back of the quilt and roll it over to the front and stitch in place, close to the folded edge. If you prefer to stitch the binding down by hand, stitch the binding on to the front of the quilt and roll it over to the back and stitch in place, along the folded edge.
There is a pattern for That Lock Gate that you can download here
[youtube https://www.youtube.com/watch?v=rkd3RhUl19M]
[youtube https://www.youtube.com/watch?v=Xc3l9Y_O8VM]
Using the remaining 2 of the darkest green strips (2” x 15 1/2”), these are the top and bottom, so place them, right sides together, with the raw edges level along the top and bottom and stitch in place (1/4” seam). Press over and stitch close to the seam line.
Machine quilt with a wood grain look going across the quilt.
Trim the quilt ready for binding.
Well. the quilt is almost done! Just the binding to go now, and add a sleeve in if you want to. Using the 3 darkest rust strips (2 1/4” x 26” strips), join them together to make the binding, fold in half along the length.
Trim the quilt and bind. If binding entirely by machine, stitch the binding on to the back of the quilt and roll it over to the front and stitch in place, close to the folded edge. If you prefer to stitch the binding down by hand, stitch the binding on to the front of the quilt and roll it over to the back and stitch in place, along the folded edge.
There is a pattern for That Lock Gate that you can download here
[youtube https://www.youtube.com/watch?v=rkd3RhUl19M]
[youtube https://www.youtube.com/watch?v=Xc3l9Y_O8VM]